Washed-out skin, flat background, the kind of lighting that whispers “spreadsheets” even when you’re trying to pitch something creative. I wanted that cinematic, editorial glow you see in Soho studios. I didn’t want a whole production crew.
I hit “Join” with a mug-turned-prop in my hand and a deadline hovering in my inbox. The webcam flickered. The screen showed my face as the colour of cold tea. In the tiny preview window, I caught the defeated look you wear when your environment doesn’t match your ambition. *I thought the problem was my face.*
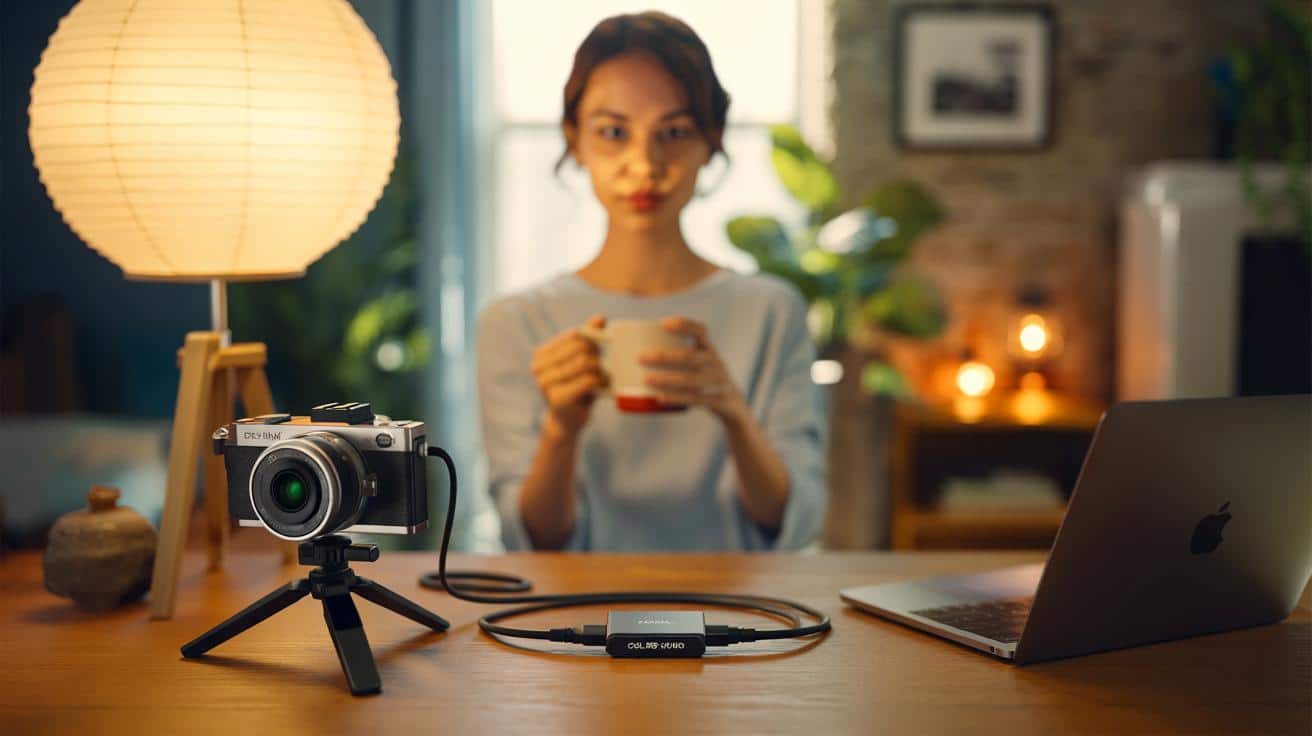
Then a package arrived: a pocket-sized USB capture card. It cost less than my last sushi lunch, and it turned the camera I already owned into a proper webcam. The first call I made with it, a colleague blurted: “Wait—have you hired a studio?” I smiled. Something was different.
The £15 dongle that changes everything
The upgrade was almost embarrassing in its simplicity. A cheap HDMI-to-USB capture card, no bigger than a KitKat finger. It let my ageing mirrorless camera send a clean, crisp video feed into Zoom as if it were a regular webcam. Suddenly, depth, colour and texture showed up.
If you’re picturing cables everywhere and an engineer’s patience, you’re overthinking it. One cable out of the camera, one into the dongle, and the dongle into the laptop. That’s it. No driver CDs. No software that wants your email. Just an instant, dramatic leap in how everything looks.
Within minutes, the flat, grey office became something else. Background blur softened the clutter. Skin tones stopped arguing with the light. The room felt like a Soho studio not because I changed the room, but because I finally let a real lens tell the story.
At first, I treated it like a gimmick. Then I started noticing the numbers. Average watch time on recorded calls improved. People stayed with demos longer. A producer friend messaged to ask what colour grading I was using. There wasn’t any. It was the glass and the sensor, finally unshackled by the laptop’s built-in potato-cam.
I ran a tiny test over a week. Three meetings with the laptop camera, three with the mirrorless via the capture card. More nods. Fewer “sorry, can you repeat that?” interruptions. And an unsolicited compliment from a client who normally notices nothing but the bottom line. In a world of one-second judgments, the signal got through faster.
The science behind the magic is boring and beautiful. Your laptop webcam has a tiny sensor and a wide lens that flattens faces and drags noise into the image. A mirrorless camera gives you a larger sensor, a decent lens, and the option to control light like an adult. The capture card is the passport between those worlds. It turns “video input” into “vibe.”
How to set it up like a Soho studio in under 15 minutes
Start with the camera you already own. A mirrorless or DSLR with “clean HDMI” out is ideal. Plug the HDMI cable into the camera, the other end into the capture card, and the USB into your computer. Set the camera to 25fps, shutter around 1/50, aperture somewhere between f/1.8 and f/4 depending on your lens, ISO as low as your room allows.
Now deal with light. A cheap desk lamp pointed through a paper lampshade will do more than you think. Place it 45 degrees to one side of your face and slightly above eye level. If the light looks harsh, bounce it off a white wall. Keep daylight consistent by closing the curtains, or match it by setting your camera’s white balance to 5000–5600K. Let the background sit a touch darker than your face.
Position matters. Frame yourself from the chest up and leave a little headroom. Pull the camera a bit further away and zoom in. That compresses the background and hides the chaos. Tilt the lens slightly down for a subtle, flattering angle. Then move one object in the background—a plant, a framed print—into a clean, visible spot. That single detail reads “intent.”
There’s a rhythm to getting the look. Power to the camera matters, so use a dummy battery if you can. Lock your focus on your eye and switch off face-smoothing gimmicks. If your camera has a picture profile, pick something neutral. Noise is not texture. Grain only looks good on film sets and Instagram filters.
Let’s be honest: nobody actually does this every day. But a two-minute checklist before a big meeting changes the room. Quick wipe of the lens. White balance set. Light angled right. Chair centred. That’s your ritual. The rest is muscle memory and not touching anything once it’s perfect.
We’ve all had that moment when a call starts and we suddenly see ourselves as other people do. This is the fix for that flash of discomfort, the small tech that removes the tiny layer of self-consciousness and lets you get on with the work. The compliments are nice. The clarity is better.
“I don’t know what you changed, but you look like you’re on the news,” said a client mid-call. That was the £15 dongle talking.
- Budget: £15–£25 for a USB capture card, £8 for a paper lantern, £0 if you already have a camera.
- Camera settings cheat sheet: 25fps, 1/50 shutter, f/2–f/4, ISO 200–800, white balance 5200K.
- Placement: camera at eye height or a touch above, light at 45 degrees, background slightly dimmer.
- Power: dummy battery or USB power bank if your camera supports it.
- Bonus lift: a cheap 50mm lens makes everything look effortlessly expensive.
What changes when your room looks like this
The real shift is in how people respond. Meetings feel calmer when faces look natural. You look awake without trying too hard. Small pauses land with weight because the picture has presence. It’s not vanity. It’s communication working the way you hoped.
I’m not pretending the tech fixes everything. It just removes a barrier that shouldn’t have been there in the first place. You spend less time apologising for glare or fiddling with settings. You spend more time connecting. That soft background blur does part of the talking.
There’s a quiet confidence that shows up when the picture looks like you. The room doesn’t need to change. The energy does. And it’s funny how that tiny piece of metal and plastic shifts the whole mood. A dongle isn’t glamour. But the results are.
This is an invitation, not a prescription. Share the trick with a colleague who hates their webcam. Borrow a lens from a friend. Swap tips in your team chat. A studio isn’t a postcode in London. It’s a set of choices you can make in a small room with a small budget.
| Key points | Detail | Reader Interest |
|---|---|---|
| USB capture card | Turns a mirrorless/DSLR into a plug-and-play webcam via HDMI | Instant, low-cost transformation |
| Lighting position | 45-degree key light, slightly above eye line, gentle diffusion | Flattering skin tones, soft shadows |
| Framing and settings | Eye-level lens, 1/50 shutter at 25fps, f/2–f/4, 5200K white balance | That “Soho studio” look without the postcode |
FAQ :
- Will this work with Zoom, Teams, and Google Meet?Yes. The capture card shows up as a standard webcam in most video apps on Mac and Windows.
- Do I need an expensive camera or lens?No. Any camera with clean HDMI output will do. A basic 35mm or 50mm lens often looks best in small rooms.
- What about overheating or battery life?Use a dummy battery for mains power. If your camera overheats, drop the resolution to 1080p and turn off unnecessary features.
- Is there a delay or sync issue?Latency is tiny. If audio drifts, use your laptop mic or an external USB mic and select both in your video app settings.
- How do I know if my camera has “clean HDMI”?Check your manual or search your model plus “clean HDMI.” If you see overlays on screen, turn off display info in the camera menu.