A faint whistle by the window, a grey draft crawling along the floor, and the heating working twice as hard for half the comfort.
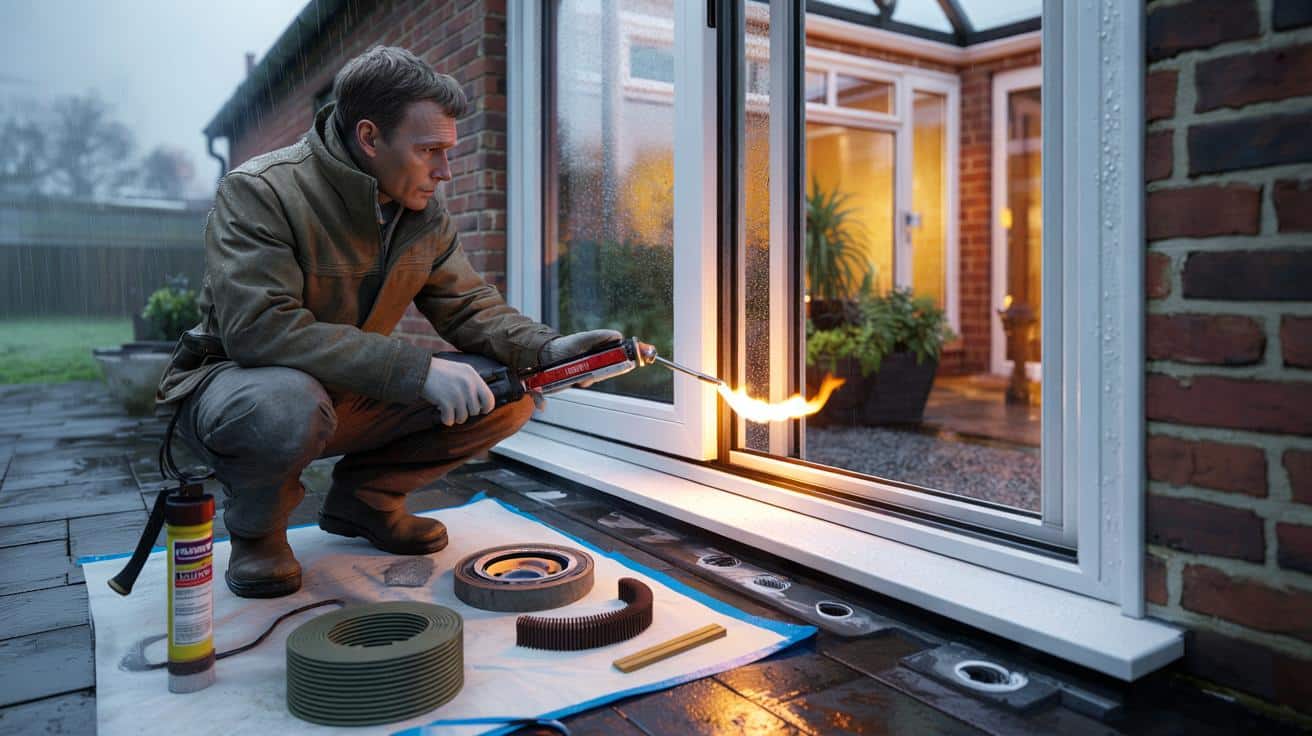
I’m standing in a glassy back room of a red-brick semi in Derby as the rain needles sideways. The owners say the conservatory looks pretty but “bleeds heat like a sieve”. The air tastes of damp soil, and somewhere a trickle vent chatters. A builder named Colin arrives, boots thudding, and runs a calloused finger along the uPVC frame where the sealant has shrunk away like a receding tide.
He doesn’t rush. He listens. Then he strikes a match and moves the flame beside the glazing bead. The flame bends sharply, like a flag in a gust. He smiles, not unkindly. “There it is.” The thieves aren’t loud.
Where your conservatory really loses heat
Most people blame the glass. It’s the frames that betray you first. uPVC and aluminium expand in the sun, then contract hard at night, and those tiny daily breath-ins open hairline gaps you can’t see at a glance.
The seals harden, the beadings loosen, and the once-neat silicone along the outside perimeter slumps or lifts. Warm air slinks out through the path of least resistance. Cold air snakes in along the sill. You feel it in your shins before your brain catches up.
Colin shows me a photo on his phone from a job in Leeds last January. A chilly conservatory, pale tile floor, and a cheap thermal camera image glowing blue around the window edges. The centre of the double glazing is fine; it’s the edges that blaze cold.
He tells me the family thought they needed new windows. They didn’t. He re-did the perimeter seal outside, swapped a perished gasket, and added brush seals to the door. Their meter stopped spinning like a roulette wheel. It cost a fraction of a replacement.
Heat loss thrives on the smallest breaks in continuity. Conduction through glass matters, sure, but the draught at the frame turns your room into a chimney. Warm air rises, cold air rushes in low, and a slow cyclone forms that never lets you settle.
That’s why draught-proofing windows in a conservatory pays you back twice: you calm the air and you cut the leak. The glass can only do so much alone. The edges determine comfort.
A builder’s step-by-step to seal conservatory windows properly
Start with a smoke test. On a breezy day, hold a stick of incense or a lighter’s flame along the window perimeter, especially corners, sills and around trickle vents. If the smoke swings or the flame leans, you’ve found a gap.
Do a paper test on opening sashes: close the window on a strip of paper and tug. If it slides out easily, you need to adjust the hinges or add fresh draught strip. Clean the frames with isopropyl alcohol. Scrape out old, cracked sealant with a hooked blade. Measure the gaps. For anything wider than 5 mm, push in backer rod first, then apply a smooth bead of neutral-cure, low-modulus silicone on the outside. Tool it with a wet finger or finishing tool. **Seal the outside perimeter first.**
Use neutral-cure silicone on uPVC and coated aluminium. Avoid acetic-cure “vinegar” silicones that can stain or corrode metal. For timber, use a high-quality paintable acrylic caulk indoors, and flexible exterior frame sealant outside.
Keep clear of weep holes and trickle vents — they’re there for drainage and background ventilation. Work in dry weather, between 5°C and 25°C, and support deep gaps with backer rod so your sealant isn’t just a fat, doomed bridge. Let’s be honest: nobody does that every day. But do it this once, and it sticks.
On opening sections, renew perished rubber gaskets with EPDM replacements, and add P- or E-profile draught strips where the sash meets the frame. For the door, fit brush seals on the threshold and sides. Tight is good, jammed is not. **Do not block weep holes.** We’ve all had that moment when a quick fix creates a bigger headache.
“Think like water and like air,” Colin says. “Where would I sneak in if I were cold and mean? Then close that route gently, not grudgingly.”
- Toolkit: scraper, silicone gun, neutral-cure low-modulus silicone, acrylic caulk (for timber inside), backer rod, masking tape, isopropyl alcohol, cloths, finishing tool.
- Tests: smoke/flame test, paper test, hand test at skirting level, torch along beads at night.
- Materials match: uPVC/aluminium = neutral-cure silicone; timber exterior = flexible frame sealant; timber interior = paintable acrylic.
- Quick wins: adjust hinges and keeps, tighten handle screws, re-seat glazing beads, fit brush seals to the door.
- Never: seal over dirt, bridge huge gaps without backer rod, caulk in the rain, shut off all ventilation.
What not to do, and how to fix it if you already did
Sealing the inside only? You might be trapping water in the frame. Water wants out through those weep holes; don’t bury them under silicone. Work outside first, then run a neat interior bead purely for looks and air tightness after the frame drains properly.
Sealing over damp or dust will fail by February. Wipe, dry, then seal. Beads too fat can create tension and peel as the frame moves. If you’ve already made a mess, don’t panic — cut along the edges, peel, clean with alcohol, and start again with masking tape to define the line. Winter is long, but the fix is short.
Some people reach for bathroom silicone with fungicide because it’s in the cupboard. It can etch bare aluminium and discolour uPVC. Pick the right tube and you’ll gain years, not months. If your conservatory has a sliding door, check the brush pile: matted brushes leave a wind tunnel at hip height. Swap them in ten minutes and you’ll feel it at once.
“I’d rather do one careful pass than three rushed ones,” Colin says. “Clean. Prime if needed. Backer rod. Then a smooth, modest bead. That’s the job.”
- Common mistakes: blocking vents, sealing moving joints solid, ignoring hinge adjustment, using interior-only caulk outside.
- Temperature tips: store sealant indoors so it flows, warm the tip in your hand, keep a spray of soapy water for tooling.
- Time guide: small bay window edge reseal = about 60–90 minutes, plus cure time.
- Cost ballpark: £15–£30 in materials for a standard window run, more if you add gaskets and brush seals.
- Red flags: black mould behind beads, spongy timber, rattling panes — call a pro if structure or glazing integrity is suspect.
Beyond caulk: simple upgrades to keep heat in
Sealing the leaks is the baseline. Layer comfort on top of that. Fit thermal blinds or pleated insulated shades that clip close to the glass and hush the night chill. Apply clear secondary-glazing film for the coldest months — it’s not forever, but it’s a quiet marvel on windy streets. If your roof is polycarbonate, consider temporary insulated roof panels or a thermal sail during winter weeks to calm the radiant chill.
Mind moisture. Keep trickle vents cracked to manage condensation, and run a small dehumidifier on wet mornings. Condensation often looks like a window issue when it’s a ventilation issue. Add a heavy curtain or door sausage to the house–conservatory doorway so you’re not reheating the whole garden.
Set a gentle routine. Walk the perimeter once a year with a cloth and eyes open. Touch the frames, look for cracks, listen for whistles. Small, early fixes beat big, late ones. And if you spot something that feels bigger than a tube of silicone? Snap a photo and ask a local glazier or builder for a quick look. **Most pros will give you fifteen minutes of gold if you show them you’ve tried.**
There’s a quiet satisfaction in taming a room that used to bully you. Seal the edges, calm the draughts, and the conservatory stops feeling like a distant cousin and starts feeling like part of the home. Share a photo of your smoke test, trade notes with your neighbour about gaskets, and borrow a thermal camera from the library if your town has one.
Your meter won’t clap, but your toes will. Warmth returns in layers — a bead of silicone here, a brush seal there, and a blind that actually fits. Tell us what trick surprised you most; someone down the road probably needs it too.
| Point clé | Détail | Intérêt pour le lecteur |
|---|---|---|
| Find the leaks first | Smoke test, paper test, thermal photo at night | Fix the real problem, not the wrong bit |
| Seal the perimeter outside | Neutral-cure silicone + backer rod, tidy tooling | Instant comfort lift and lower bills |
| Upgrade draught proofing | EPDM gaskets, P/E strips, brush seals, keep weep holes open | Warmer room, fewer cold spots, less condensation |
FAQ :
- Can I seal conservatory windows on a rainy day?Best to wait for dry conditions between 5°C and 25°C. If you must, use a fast-cure exterior sealant and cover from rain, but drying time doubles.
- Which sealant should I use for uPVC, timber and aluminium?uPVC/aluminium: neutral-cure, low-modulus silicone. Timber exterior: flexible frame sealant. Timber interior: paintable acrylic caulk.
- Should I seal inside or outside?Outside comes first to stop water and air. Inside is a neat finish and extra air seal, but never trap water by blocking drainage.
- What about condensation after sealing?Keep trickle vents slightly open, use a small dehumidifier on damp days, and add thermal blinds. Don’t block weep holes.
- How long does it take and what does it cost?One window run takes about 60–90 minutes plus cure time. Materials from £15–£30; adding gaskets/brush seals might add £20–£40.